> For the complete documentation index, see [llms.txt](https://nso-docs.cisco.com/llms.txt). Markdown versions of documentation pages are available by appending `.md` to page URLs; this page is available as [Markdown](https://nso-docs.cisco.com/guides/operation-and-usage/webui.md).
# Web UI
Operate NSO using the Web UI.
The NSO Web UI provides an intuitive northbound interface to your NSO deployment. The UI consists of individual views, each with a different purpose to perform operations such as device management, service management, commit handling, etc.
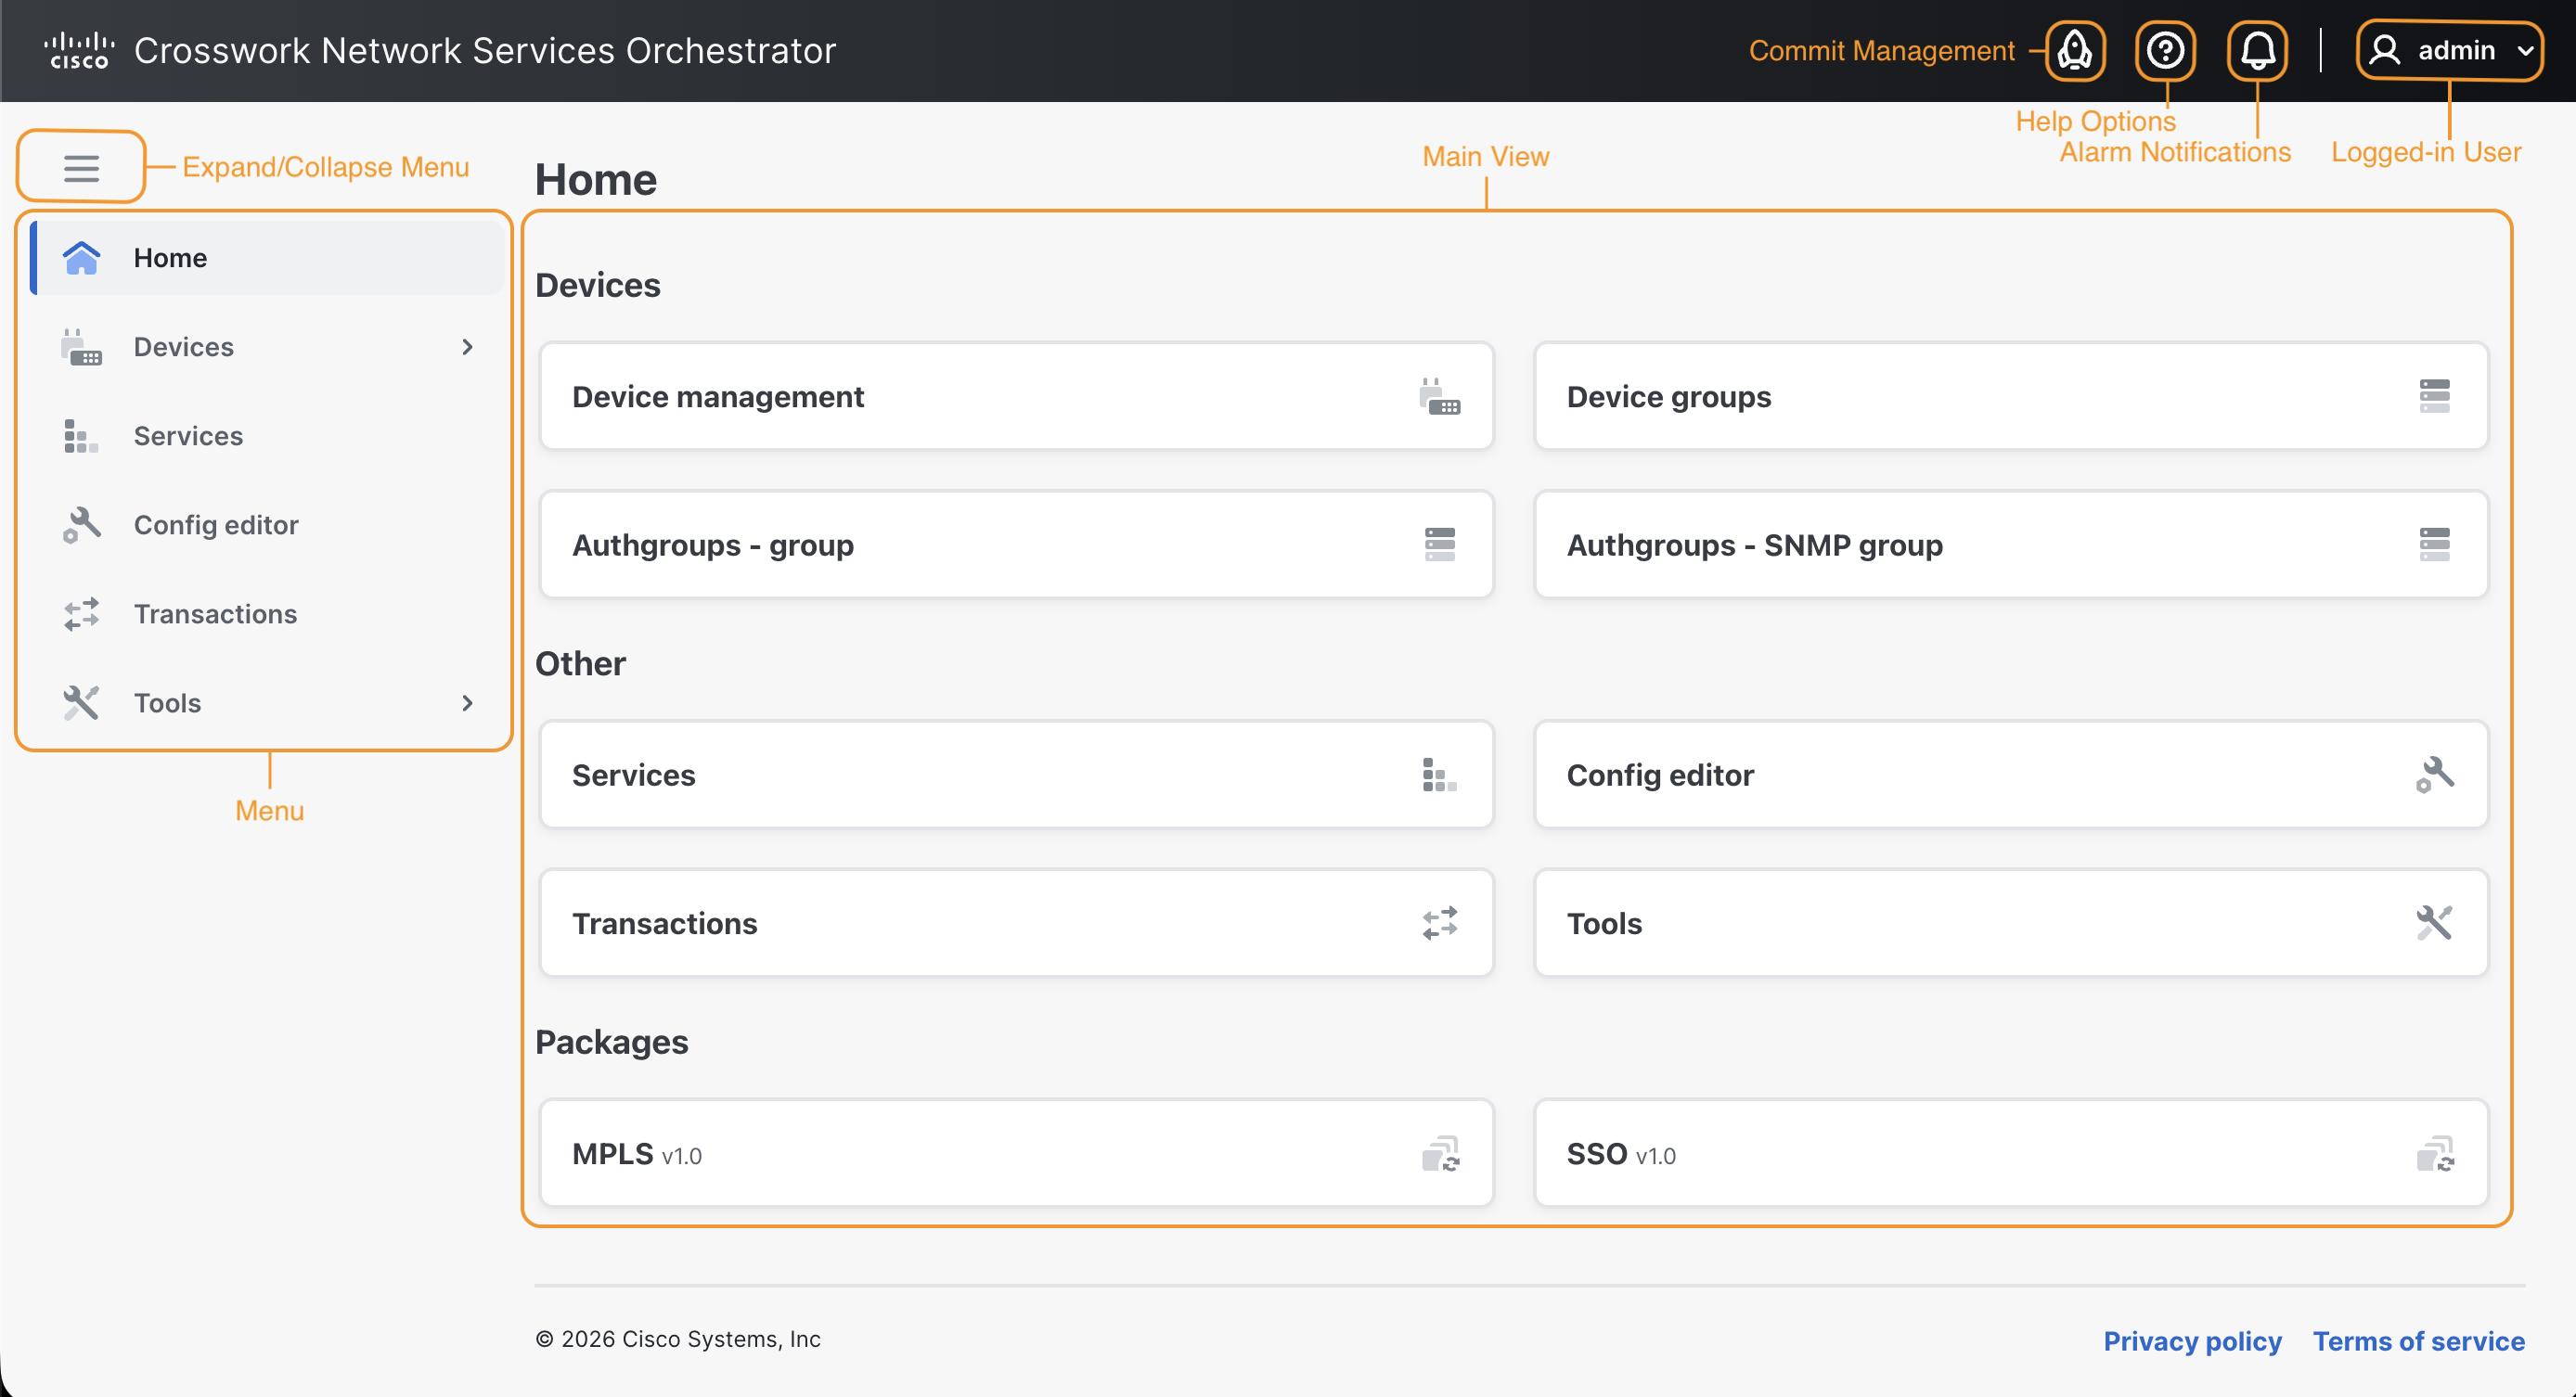
The main components of the Web UI are shown in the figure below.
NSO Web UI Overview
The UI works by auto-rendering the underlying device and service models. This gives the benefit that the Web UI is immediately updated when new devices or services are added to the system. For example, say you have added support for a new device vendor. Then, without any programming requirements, the NSO Web UI provides the capability to configure those devices.
{% hint style="info" %}
It's important to understand that the bulk of concepts and configuration options in Web UI are shared with the NSO CLI. The rest of the documentation covers these in detail. You need to be familiar with the fundamental concepts to work with the Web UI.
{% endhint %}
## Browser Requirements
All modern web browsers are supported, and no plug-ins are needed. The interface itself is a JavaScript client.
## Accessing the Web UI
By default, the Web UI is accessible on port 8080 of the NSO server for an NSO Local Install and port 8888 for a System Install. The port can be changed in the `ncs.conf` file. Users are required to authenticate before accessing the Web UI.
## Basic Operations
### **Log In**
Log in to the NSO Web UI by using the username and password provided by your administrator. SSO SAML or OIDC login is available if set up by your administrator. If applicable, use the SSO option to log in.
### **Log Out**
Log out by clicking your username on the top-right corner and choosing **Logout**.
### Theme
Apply a theme for the user interface by clicking your username and selecting from **Light**, **Dark**, or **System** **default**.
### **Help Options**
Access the help options by clicking the help options icon in the UI banner. The following options are available:
* **Online documentation**: Access the Web UI's online help.
* **Manage hidden groups**: Administer hidden groups, e.g., for debugging. Read more about hide groups in [CLI Commands](/guides/operation-and-usage/cli/cli-commands.md).
* **NSO version**: Information about the version of NSO you are running.
In the Web UI, supplementary help text, whenever applicable, is available on the configuration fields and can be accessed by clicking the info icons.
## Dirty State
Anytime a configuration is changed in the Web UI (such as a device or service configuration change), the UI reflects the change with a so-called color-coded "dirty state" with the following meanings:
* Blue color: An addition or a modification to an already-committed list element was made.
* Red color: A deletion was made.
## Commit Management
Commit options are accessible at all times from the UI header. A number, corresponding to the number of changes in a transaction, is displayed next to the icon when changes are available for review. These changes can be reviewed in the **Transactions** view. For certain actions, it is possible to skip the commit review and apply the changes directly.
{% hint style="warning" %}
**Transactions and Commits**
Take special note of commit management. Whenever a transaction has started, the active configuration data changes can be inspected and evaluated before they are committed and pushed to the network. The data is saved to the NSO datastore and pushed to the network when a user presses **Commit**.
Any network-wide configuration change can be picked up as a rollback file. The rollback can then be applied to undo whatever happened to the network.
{% endhint %}
### **Review a Configuration Change**
To review available configuration changes:
1. Access commit management by clicking its icon in the banner.
2. Review the available changes by clicking the **Changes** or **Transactions** option. This action redirects you to the **Transactions** view.
3. Press **Validate** to check for errors. All changes must be validated before they can be committed.
4. Click **Revert** to undo or **Commit** to confirm the changes in the transaction.
5. If you are committing a change, **Commit Settings** are shown after pressing **Commit**. Examples of commit settings include: **No revision drop**, **No deploy**, **No networking**, etc. Commit options are described in detail in the JSON-RPC API documentation under [Methods - transaction - commit changes](/guides/development/advanced-development/web-ui-development/json-rpc-api.md#methods-transaction-commit-changes).
---
# Agent Instructions
This documentation is published with GitBook. GitBook is the documentation platform designed so that both humans and AI agents can read, navigate, and reason over technical content effectively. Learn more at gitbook.com.
## Querying This Documentation
If you need additional information that is not directly available in this page, you can query the documentation dynamically by asking a question.
Perform an HTTP GET request on the current page URL with the `ask` query parameter, and the optional `goal` query parameter:
```
GET https://nso-docs.cisco.com/guides/operation-and-usage/webui.md?ask=&goal=
```
`ask` is the immediate question: it should be specific, self-contained, and written in natural language.
`goal` is optional and describes the broader end goal you are ultimately trying to accomplish on behalf of the user. GitBook uses it to tailor the answer towards what is most useful for that goal.
The response will contain a direct answer to the question and relevant excerpts and sources from the documentation.
Use this mechanism when the answer is not explicitly present in the current page, you need clarification or additional context, or you want to retrieve related documentation sections.
 icon when changes are available for review. These changes can be reviewed in the **Transactions** view. For certain actions, it is possible to skip the commit review and apply the changes directly.
{% hint style="warning" %}
**Transactions and Commits**
Take special note of commit management. Whenever a transaction has started, the active configuration data changes can be inspected and evaluated before they are committed and pushed to the network. The data is saved to the NSO datastore and pushed to the network when a user presses **Commit**.
Any network-wide configuration change can be picked up as a rollback file. The rollback can then be applied to undo whatever happened to the network.
{% endhint %}
### **Review a Configuration Change**
To review available configuration changes:
1. Access commit management by clicking its icon
icon when changes are available for review. These changes can be reviewed in the **Transactions** view. For certain actions, it is possible to skip the commit review and apply the changes directly.
{% hint style="warning" %}
**Transactions and Commits**
Take special note of commit management. Whenever a transaction has started, the active configuration data changes can be inspected and evaluated before they are committed and pushed to the network. The data is saved to the NSO datastore and pushed to the network when a user presses **Commit**.
Any network-wide configuration change can be picked up as a rollback file. The rollback can then be applied to undo whatever happened to the network.
{% endhint %}
### **Review a Configuration Change**
To review available configuration changes:
1. Access commit management by clicking its icon  in the banner.
2. Review the available changes by clicking the **Changes** or **Transactions** option. This action redirects you to the **Transactions** view.
3. Press **Validate** to check for errors. All changes must be validated before they can be committed.
4. Click **Revert** to undo or **Commit** to confirm the changes in the transaction.
5. If you are committing a change, **Commit Settings** are shown after pressing **Commit**. Examples of commit settings include: **No revision drop**, **No deploy**, **No networking**, etc. Commit options are described in detail in the JSON-RPC API documentation under [Methods - transaction - commit changes](/guides/development/advanced-development/web-ui-development/json-rpc-api.md#methods-transaction-commit-changes).
---
# Agent Instructions
This documentation is published with GitBook. GitBook is the documentation platform designed so that both humans and AI agents can read, navigate, and reason over technical content effectively. Learn more at gitbook.com.
## Querying This Documentation
If you need additional information that is not directly available in this page, you can query the documentation dynamically by asking a question.
Perform an HTTP GET request on the current page URL with the `ask` query parameter, and the optional `goal` query parameter:
```
GET https://nso-docs.cisco.com/guides/operation-and-usage/webui.md?ask=
in the banner.
2. Review the available changes by clicking the **Changes** or **Transactions** option. This action redirects you to the **Transactions** view.
3. Press **Validate** to check for errors. All changes must be validated before they can be committed.
4. Click **Revert** to undo or **Commit** to confirm the changes in the transaction.
5. If you are committing a change, **Commit Settings** are shown after pressing **Commit**. Examples of commit settings include: **No revision drop**, **No deploy**, **No networking**, etc. Commit options are described in detail in the JSON-RPC API documentation under [Methods - transaction - commit changes](/guides/development/advanced-development/web-ui-development/json-rpc-api.md#methods-transaction-commit-changes).
---
# Agent Instructions
This documentation is published with GitBook. GitBook is the documentation platform designed so that both humans and AI agents can read, navigate, and reason over technical content effectively. Learn more at gitbook.com.
## Querying This Documentation
If you need additional information that is not directly available in this page, you can query the documentation dynamically by asking a question.
Perform an HTTP GET request on the current page URL with the `ask` query parameter, and the optional `goal` query parameter:
```
GET https://nso-docs.cisco.com/guides/operation-and-usage/webui.md?ask=